After completing the first step of designing socks for our Lucky Monkey, the brainstorming session, it's then time to get to the part we love best - hand sketches.
 |
| Hand Sketching our Lucky Monkey |
Here is our first design of our Lucky Monkey. After sending this over to our sock factory; two main alterations were advised and required.
 |
| Our Initial Monkey Design |
Secondly, the design had too much detail. As much as the headband looks great, the fine weaving required would potentially have an effect on the look of the product and overall quality. This lead us to simplify design.
Designing Socks: Simplifying and refining the look of our lucky monkey.
This was the next design from our team and again we submitted to factory for feedback.
 |
| Simplifying and Refining |
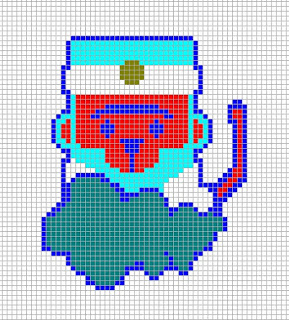
After the design was finalised, the factory then provided us with a grid map of our Lucky Monkey sock. Each individual square represents a sewing point. This sewing pattern is then interpreted by computer for production. Shading represents the different colours of yarn needed. This allows us to picture how big or small we want our monkey to be on our customised sock.
 |
| Grid map of our Lucky Monkey |
You always need to talk through designs with factory. A small issue with our design was the positioning of the logo on the base of the foot - potentially causing discomfort when walking. A quick shift of design, and our monkey socks were ready for sampling.
 |
| The Final Design |
Monkey Socks are now in sampling so check back on our promotional product blog for more case studies.
Our next blog will be about the packaging and tag aspect to our lucky monkey socks; be sure to keep an eye on our friends at ODM's twitter and Facebook to be the first to find out when it is posted.


